Mitsubishi Space Runner Repair Manual

Manufacturer: Mitsubishi
Model: Space Wagon/ Space Runner
Year: 1998


Contains the following information and repairs for:

  • General
  • Engine
  • Engine Lubrication
  • Fuel
  • Engine Cooling
  • Intake and Exhaust
  • Engine Electrical
  • Engine and Emission Control
  • Clutch
  • Manual Transmission
  • Automatic Transmission
  • Propeller Shaft
  • Front Axle
  • Rear Axle
  • Wheel and Tyre
  • Power Plant Mount
  • Front Suspension
  • Rear Suspension
  • Service Brakes
  • Parking Brakes
  • Steering
  • Body
  • Exterior
  • Interior and Supplemental Restraint System
  • Chassis Electrical
  • Heater, Air Conditioner and Ventilation
File Size 50 MB
File Type: PDF
Read More..

More Information on Paying For Car Diagnostics Auto Repair Diagnosis Truck Diagnosis


In my previous blog post I received a lot of feed back on this topic of paying for a car diagnosis if the problem can’t be found by the auto mechanic. Auto repair diagnosis can be very simple as a vacuum leak or it can be very difficult like a short in an electrical circuit. Deciding weather to pay or not to pay for your vehicle diagnostics isn’t really a choice unless you have an understanding with your auto mechanic before hand. The auto repair shop can legally hold your keys and car until the bill is paid. But of course most people realize that. As a former 25 year certified auto technician I can give you some helpful advice on paying for your diagnosis.
Help Your Mechanic Find Your Car Problem:

If you have an idea of what it might be let the service writer know before hand. Give them every little detail of what the vehicle is doing and what it sounds and smells like. This will speed up his diagnostic time and your charges will stay lower. You are maybe thinking why should I give him this information if I have to pay him. Just by giving him or her this information could and will speed them up finding your problem. By the time you are through telling the auto repair shop all of the details they may have already figured out where your car problem is and how much it will take to fix and repair.

Have Your Auto Repair Shop Explain Their Diagnostic Routine:

Before you hand the auto repair shop your car or truck keys, make sure that you fully understand their diagnostic routine to you such as prices, shop labor rates, and the old shop supply charges you are will be charged. Most of the confusion when it comes time to pay for your car repair diagnosis is because the customer did not fully understand how and why they are being charged. Paying hourly can be very expensive if you fall prey to the wrong auto repair shop.

Insist on Staying and Waiting For the Auto Repair Diagnosis:

If you wait and check on the auto repair shop’s progress from time to time you can be sure they spend quality time on your vehicle rather than taking breaks and reading news papers or, this day and age playing computer games. You may be approached and asked to leave and they will call you when they find something. Don’t fall for this delay tactic and attempt to get you to leave. Tell the auto repair shop guys you don’t mind waiting.


I hope this information will help you feel better when it comes time to pay for your car or trucks diagnosis. Just remember that there will be a Small diagnostic charge which is usually a half hour or .5 of an hour weather they find the problem or not. (around $25-$35) Or you can call these guys for a very fast second opinion. The auto repair shop will not expect you to have certified trained mechanics only a phone call away! Good Luck!

Keywords- car or truck diagnosis, auto repair, car repair, vehicle repair, auto mechanic
Read More..

Ford Courier 1974 76 Brake Repair Guide

DESCRIPTION
Courier dual brake system consists of a dual master cylinder, combination valve, system failure warning light, two single piston hydraulic cylinders (front wheels) and two dual piston hydraulic cylinders (rear wheels). All lines are connected to both master cylinder and combination valve. Both front and rear brakes operate same (pressurized brake fluid forced to wheel cylinder). Front cylinders however, expand each shoe individually and rear dual piston cylinders expand both shoes equally.
ADJUSTMENT
PEDAL FREE PLAY
Fig. 1 Front Brake Assembly Exploded View
Loosen lock nut on master cylinder push rod at clevis. Turn push rod in or out to obtain .12-34" (3.0-8.6 mm) free play, measured at pedal pad. When clearance is obtained, tighten lock nut.
BRAKE SHOES
All shoe to drum adjustments must be made with brake shoes at normal room temperature. Turn lower wheel cylinder ratchet to expand brake shoe locking it against drum. Back-off ratchet 5 notches or until drum rotates freely. Repeat procedure for upper wheel cylinder.

Fig. 2 Rear Brake Assembly Exploded View
PARKING BRAKE CABLE
NOTE - Service brakes must be properly adjusted before adjusting parking brake. Adjust length of cable at equalizer so that rear brakes are locked when parking brakes lever is pulled out five to ten ratchet clicks (1 5/8-3 1/2"). After adjustment, apply and release parking brake several times, and make sure wheels rotate freely when parking brakes is released.
COMBINATION VALVE
Combination Valve Reset - Place ignition switch in the on position. Depress brake pedal and piston will center itself. This will cause brake warning light to go out.
HYDRAULIC SYSTEM BLEEDING
NOTE -  Front and rear hydraulic systems are individual systems and are bled separately. Bleed longest line first on individual system being serviced.
Manual Bleeding - 1) Attach a bleeder tube to right rear lower brake cylinder, and immerse opposite end of tube in a container partially filled with brake fluid. Open bleeder screw 3/4 turn, push brake pedal through full travel, close bleeder screw, and return pedal. Continue operation until air bubbles are no longer seen in discharged fluid.
2) Repeat procedure at upper right rear wheel cylinder, and at wheel cylinders on left rear brake. If primary system is to be bled, repeat procedure at each right front wheel cylinder and each left front wheel cylinder. When bleeding operation is completed, fill master cylinder reservoirs to within 1/4" of top of reservoirs.
Pressure Bleeding - Attach a suitable pressure bleeder to master cylinder, with approximately 10-30 psi (.7-2.1 kg/cm2) air pressure in tank. CAUTION - DO NOT exceed 50 psi (3.5 kg/cm2). Follow manufacturers recommendations when installing bleeding equipment. Perform bleeding operation in same sequence as manual bleeding.
REMOVAL & INSTALLATION
BRAKE DRUM
Removal - Remove tire and wheel. Remove brake drum attaching screws and install them in tapered holes in brake drum. Turn screws in evenly to force drum away from wheel hub. Lift off drum.
Installation - Align attaching screw holes with ones in wheel hub. Transfer screws to retaining position and tighten evenly. Install tire and wheel.
BRAKE SHOES
Removal - Remove tire, wheel and brake drum. Remove brake shoe return springs, withdraw shoe retaining pin and spring. Disconnect handbrake link and cable from lever. Lift out brake shoes.
Installation - Reassemble handbrake. Position new brake shoes to backing plate with slots toward wheel cylinders. Install retaining springs and clips. Replace brake drum and adjust brakes.
WHEEL CYLINDER
Removal - With brake drum and shoes removed, disconnect hydraulic line from cylinder. Remove stud nuts and bolt which retain cylinder to backing plate and remove cylinder.
Installation - Reverse removal procedure, adjust brake shoes and bleed hydraulic system.
MASTER CYLINDER
Removal - Disconnect all brake lines and remove two mounting nuts and lockwashers. Lift off cylinder by pulling out and up to clear push rod.
Installation - Position master cylinder to mounting studs while guiding push rod into contact with cylinder piston. Tighten mounting nuts, connect hydraulic lines, bleed hydraulic system, and adjust brake pedal free play.
COMBINATION VALVE
Removal - Disconnect warning light wire. Disconnect hydraulic lines from combination valve. Remove bolt mounting valve assembly and take off combination valve.
Installation - To install combination valve, reverse removal procedure and note the following: Bleed hydraulic system and reset piston in valve.
OVERHAUL
Fig. 3 Disassembled View of Courier Front Wheel
Cylinder
Disassembly - Remove piston, adjusting screw, and boot from cylinder and separate. Using compressed air applied to fluid inlet, place cylinder face down and blow out piston cup, cup expander and spring.
Cleaning & Inspection - Wash all parts in sopropyl alcohol. Examine cylinder bore, piston and adjuster for wear or damage. Check clearance between cylinder bore and piston; if greater than .006" (.15 mm), replace parts as necessary.
Reassembly - Apply clean brake fluid to cylinder bore, piston, and new piston cup. Install return spring in cup expander, then install return spring, cup expander and cylinder cup into cylinder with flat side of cup outward. Install boot to piston with small lip of boot in groove of piston, install piston into cylinder, and install larger lip of boot in cylinder groove. Install adjusting screw in piston assembly.
REAR WHEEL CYLINDER 
Fig. 4 Disassembled View of Courier Rear Wheel
Cylinder
Disassembly - Remove piston, adjusting screw, and boot assemblies from each end of cylinder and separate parts. Press in on either piston cup and force out piston cups, expanders, and return spring.
Cleaning & Inspection - Wash all parts in isopropyl alcohol. Examine cylinder bore, pistons and adjusters for wear or damage. Check clearance between cylinder bore and pistons, if greater than .006" (.15 mm), replace parts as necessary.
Reassembly - Apply brake fluid to cylinder bore, adjuster and cylinder cups. Position return spring in cup expanders, place cups against expanders, and install into cylinder bore with flat side of cup facing outward. Install boot to piston into cylinder, and install larger lip of boot into cylinder groove. Install adjusting screw into adjuster.
MASTER CYLINDER
Disassembly - Remove two screws attaching reservoir to cylinder body, and lift reservoir from grommets. Remove cylinder dust boot and primary piston stop ring. Withdraw stop washer, primary piston assembly and return spring. Remove secondary piston stop screw and "O" ring, and remove secondary piston and return spring. Remove outlet port fittings, gaskets, check valves, and check valve springs.
Fig. 5 Courier Master Cylinder Assembly

Cleaning & Inspection - Clean all parts in isopropyl alcohol CAUTION - DO NOT use mineral based solvents. Check all parts for wear or damage, replace parts as necessary.
Reassembly - 1) Dip all parts except body and reservoir in clean brake fluid. Insert check valve springs and check valves, into cylinder outlets and install gaskets and fittings. Install secondary return spring on secondary piston assembly and install into cylinder bore, spring end first.
2) Install primary piston return spring to primary piston assembly and insert into cylinder bore, spring end first. Install stop washer and stop ring. Install secondary piston stop bolt. Install grommets into cylinder body, position reservoir to body, and install and tighten attaching screws.

Read More..

American Vintage Vehicles Axles Repair Manual

Manufacturers: American Classic Vintage Cars including the ff:

  • Chrysler
  • Ford
  • General Motors
  • Oldsmobile
Years Covered: 1971 to 1982

Contains the following information and Axles Repair for:
  • Drive Steering Knuckles
  • Borg Warner Differentials
  • Front Axle
  • Front Wheel Final Drive
  • Hubs - Dana or Spicer - External and Internal Locking
    • Lock-O-Matic
    • Manual Type
    • Spring Type
  • Integral Housing - Standard and WER type
  • Propeller Shaft Alignment
  • Rear Axle
  • Shafts
  • Troubleshooting
  • Traction Differentials
  • Transfer Cases
  • Universal Joints
  • Clutch Pack Type
  • Cone Brake Type
  • Wheel Final Drive
File Size: 47 MB
File Type: PDF, RAR


Read More..

Our Manuals Cover A Lot More Than Just Cars Trucks and Motorcycles

When your car, truck, or motorcycle breaks down, there are typically a number of different options available to you when it comes time to get them repaired. A repair manual for your vehicle from us will certainly provide you with the most cost effective and satisfying way to fix your car, truck, or motorcycle. However, when it comes to less commonly used vehicles such as boats and tractors, depending on the area in which you live, there can be incredibly few options for getting repairs done on your vehicles. This is why having a tractor manual or boat manuals for your other vehicles can be so essential when it comes time to give it a tune up or an essential repair.

On top of the fact that it can be difficult to find good help when it comes to tractor and boat repair, transporting those vehicles, especially boats, to the place in which they will be repaired can be a giant hassle. Being able to perform essential repairs on your boats and tractors at home will be a luxury you will undoubtedly appreciate when the time comes to fix them up.
Read More..

Porsche 911 Carrera 933 Repair Manual

Manufacturer: Porsche
Model: 911 933 Carrera


Contains the following information and repairs for:

  • Overall Vehicle - General
    • Maintenance, Diagnosis
  • Engine
    • Crankcase - Mounting
    • Crankshaft, Pistons
    • Cylinder Head, Valve Drive
    • Lubrication
    • Cooling
  • Fuel, Exhaust System, Engine Electrical System
    • Fuel Supply, Control
    • Exhaust System - Turbocharging
    • Fuel System - Electronic Injection
    • Fuel System - K-Jetronic
    • Exhaust System
    • Starter, Power Supply, GRA
    • Ignition System
  • Transmission
    • Manual Transmission - Clutch, Control
    • Manual Transmission - Gears, Shafts, Inner Operation
    • Manual Transmission - Controls, Case
    • Manual Transmission - Final Drive, Differential, Differential Lock
    • Automatic Transmission - Torque Converter 
    • Automatic Transmission - Controls, Case
    • Automatic Transmission - Gears, Control
    • Automatic Transmission - Final Drive, Differential, Differential Lock
  • Chassis
    • Front Wheel Suspension, Drive Shaft
    • Rear Wheel Suspension, Drive Shaft
    • Wheels, Tires Alignment
    • Anti-Lock Braking System (ABS)
    • Brakes - Mechanical
    • Brakes - Hydraulics, Regulator, Booster
    • Steering
  • Body
    • Body Front Section
    • Body Center Section, Roof, Frame
    • Body Rear Section
    • Hoods, Lids
    • Front Doors, Central Locking System
  • Exterior Body Equipment
    • Sunroof
    • Soft Top, Hard Top
    • Bumpers
    • Glasses, Window Control
    • Exterior Equipment
    • Interior Equipment, Passenger Protection
  • Interior Body Equipment
    • Trim, Insulation
    • Seat Frames
    • Seat Upholstery, Covers
  • Air Conditioning
    • Heater
    • Ventilation
    • Air Conditioning
    • Auxiliary Air Conditioning System
  • Electrical System
    • Instruments, Alarm
    • Radio, Telephone, On-Board Computer
    • Windshield, Wipers and Washers
    • Exterior Lights, Lamps, Switches
    • Interior Lights, Lamps, Switches
  • Wiring Diagrams
  • Diagnosis
    • Self-Diagnosis
    • DME Diagnosis
    • Triptronic Diagnosis
    • PDAS Diagnosis
    • ABS Diagnosis
    • Airbag Diagnosis
    • Heater Diagnosis
    • Alarm Diagnosis
File Size: 330 MB
File Type: PDF, RAR
Read More..

Slp Performance

Slp Performance 4f59f2c494cce1331294916

Results for Slp Performance

2003 Buick Regal Gsx

With Slp Custom Calibration Stage 2 Exterior Badge Stage 2 Performance Package 1.8 Higher Ratio Rocker Arms And Pushrods (lsx Only)

http://www.bayarearacing.org/gsx.pdf
Professional Performance Review Process For The School-based Slp

2006 / 1 Guidelines Performance Review Process For School-based Slp Guidelines Professional Performance Review Process For The School-based Speech-language

http://www.asha.org/uploadedFiles/Publications/leader/2007/070213/SLPPPRP06.pdf
Www.slp-firehawk.com

Motor City Muscle Is Back! World Class Performance, Handling & Braking * All Firehawk Content And Systems Affected By The Firehawk Alteration Are Backed By Slps 3

http://www.slp-firehawk.com/pr/Firehawk_Brochure.pdf
Performance Intake

94 Www.recreationsupply.ca Powerdomes And Cheater Heads Slp Power Dome Billet Heads For 2003 Ski-doo 800 Ho Summit Rev And 2004-07 Ski-doo 800 Rev/summit Rev/power

http://recreationsupply.ca/2011/2011-04_Performance_Intake.pdf
Best-in-class Performance

2 * Amaro ,*arguably*one*of*the*most*legendary*names*in*the* History*of*late-model*chevrolet*muscle*cars,*is*once*again*the*basis*for* Two*limited-edition*specialty

http://bravuraauto.com/img/coughlin/pataskala/slp_camaro/zl575brochure.pdf
Tuning Intructions Slp Stage 3 Performance Kit For Ski-doo 800 Xp

Tuning Intructions Slp Stage 3 Performance Kit For Ski-doo 800 Xp (carb) The Following Tuning Specification Are Config Ured To Work Specifically With The Slp Stage 3

http://www.startinglineproducts.com/instsheets/XP%20Stage%203.pdf
Performance Review System For Speech-language Pathologists In

In Consultation With The Slps In Your District/boces, The Slp Performance Review System May Provide Useful Information And A Consistent Method For Completing The

http://www.cde.state.co.us/cdesped/download/pdf/SLI_PerformanceReviewSystem.pdf
Slp Part #09-878 - Attention Dealer - Please Provide Your Customer

Slp Part #09-878 Attention Dealer Please Provide Your Customer With The Reduce Performance And/or Dependability. Please Read The Following Instructions For Best

http://www.startinglineproducts.com/instsheets/09-878.pdf
09-680 Instruction Sheet

Use Only Slp Approved Performance Belts Or Stock Polaris Brand Belts. 3. Tuning Variable. Due To Riders Weight And Conditions The Sled Is Used In, Heavier Or Lighter Clutch

http://www.slp.cc/instsheets/09-680.pdf
After 42 Years

Performance Upgrades Engine Slp Custom Built 427 Cid Engine W/aluminum Block And Heads, 10.3:1 Compression Ratio Slp 1.85:1 High-ratio Rocker Arms

http://slpcamaro.com/docs/2011ZL1SIB.pdf
Enhanced Dual-interface, And Powerful Performance

Print Printing Method : Direct Thermal Printing Printing Speed : 6 Inches Per Second(152mm Per Second) Resolution : Standard : 203dpi(8dot/mm) Optional

http://www.bixolon.it/data/slp-d220.pdf
Professional Performance Review Process (pprp) For The School

Professional Performance Review Process (pprp) For The School-based Slp: A Round Table Discussion Wsha-p Convention Thursday February 25, 2010 Oshkosh, Wi Presenter

http://wisha.org/convention/con_10/handouts/RoundTable-PPRP.pdf
Robofil 240 Slp 440 Slp

The Robofil 240 Slp And 440 Slp Offer Excellent Performance. They Are Equipped With Unique Machining Technology, Specially Optimized To Increase Cutting Performance.

http://www.charmillesus.com/newsroom/literature/Charmilles/25980422_ROBOFIL%20X40%20SLP%20US.pdf
Session Agenda

6 Slp Reviews Ppri Performance Indicators On The Self-rating Scale: 31 0 = Not The Roles And Responsibilities Of The School-based Speech-language Pathologist .

http://www.txsha.org/_pdf/Convention/09Convention/New%20Folder/Thomas,%20Jamie-Performance%20Review%20Process%20for%20the%20School-Based%20SLP.pdf
Motor City Muscle Is Back!

Produced And Available At Slp Performance Parts, Inc. (slp), And Select Pontiac Dealerships Nationwide, Firehawk Offers The All-around Powertrain Performance, Superior

http://www.slp-firehawk.com/pr/Firehawk%20Press%20Release.pdf
Cobb County School District Cobb Keys Speech Language Pathologist

Signature Does Not Indicate Agreement Or Disagreement. Slp Gets A Copy After Signatures; Retain Original And Submit With Slp Performance Report.

http://www.cobbk12.org/centraloffice/hr/employeerelations/pass/Documents/Performance%20Evaluations/8-9-2010/SLP%20Observation%20form.pdf
Slp Single Pipe For 2007 Polaris 700 H.o. Dragon Iq/rmk

Slp Single Pipe For 2007 Polaris 700 H.o. Dragon Iq/rmk Part # 09-723 Kit Contents: 1 To Your Exhaust System To Provide A Thermal Barrier For More Consistent Performance.

http://www.hiperf.com/acatalog/09-723.pdf
Performance And Appearance Products

Exhaust Systems And Components Slps Axle-back Exhaust Systems Were Designed And Tuned Specifically For The New 2010 V6 And V8 Camaros. The Resulting Tone Is Deep

http://bravuraauto.com/img/coughlin/pataskala/slp_camaro/2010%20Camaro%20AM%20Supplement.pdf
Read More..

Hyundai Sonata 1991 Repair Manual

Manufacturer: Hyundai
Model: Sonata
Year: 1991


Contains the following information and repairs for:

Hyundai Sonata 1991 Engine
  • General Information
  • Lubrication and Maintenance
  • Engine
  • Cooling System
  • Engine Electrical System
  • Intake and Exhaust System
  • Emissions Control Systems
  • Fuel System
  • Clutch
  • Manual Transaxle
  • Automatic Transaxle
  • Drive Shaft and Front Axle
  • Front Suspension
  • Rear Suspension
  • Steering System
  • Brake System
  • Body (Interior and Exterior)
  • Body Electrical System
  • Air Conditioning System
  • Appendix
File Size: 90 MB
File Type: PDF, RAR
Read More..

Opel Astra J Body Repair Manual

Manufacturer: Opel
Model: Astra_J
Year: 2011


Contains the following information and repairs for:

  • General Information
  • Body Hardware and Trim
  • Body Repair
  • Body Systems
  • Roof
  • Seatbelts
  • Seats
  • Restraints
  • Steering
  • Suspension
  • HVAC System


File Size: 32 MB
File Type: PDF, RAR
Read More..

BMW 528e 1987 Electrical Repair

Electrical Troubleshooting Manual, Schematic and Wiring Diagrams for:
Manufacturer: BMW
Model: 528e
Year: 1987 
*1987 Vehicles Built Before 9/1986 Use 1986 528e Electrical Troubleshooting Manual for Diagnostics


Quick Reference Index:

  • Power Distribution Box
  • Fuse Data
  • Diagnostic Connector
  • Start
  • Antilock Braking System (ABS)
  • Splice Location Views
  • Injection Electronics
  • Fuel Control/ Idle Speed Control
  • Ignition and Charging System
  • Engine Block Diagrams
  • Wiper/ Washer
  • Speedometer/ Gauges/ Warning Indicators
  • Active Check Control
  • Brake Lining Warning
  • Ignition Key Warning Seatbelt Warning
  • Headlights/ Fog Lights/ Turn/ Hazard Warning
  • Front Park/ Front Maker/ Tail
  • Rear Marker/ License/ Trunk
  • Cruise Control/ Stop Lights
  • Dash Lights/ Interior Lights
  • A/C Temperature and Blower Controls
  • Back Up/ Transmission Range/ Heated Door Lock
  • Cigar Lighter/ Glove Box Light/ Digital Clock/ Auto-Charging Flashlight
  • Horn/ Sunroof/ Rear Defogger/ Power Windows/ Mirrors/ Central Locking (select)
  • Central Locking (control)/ Radio/ Power Antenna/ Auxiliary Fan/ Heater/ Air Conditioning
  • Ground Distribution/ Component Locations/ Notes
File Size: 13 MB
File Type: PDF, ZIP
Read More..

Auto Repair Shop Hourly Rates and Auto Parts Prices

Wouldn’t this be a nightmare seeing auto mechanics expanding out and opening auto parts stores combined with their auto service centers and their own tow truck service? It sounds kind of like a tongue twister if you sit back and think about this. Just the idea of a team of auto mechanics coming together and controlling prices for their parts and labor with tow truck service resulting in sky rocketing auto repair bills for you and me. That is the part that sounds like a night mare to me! Let me explain to you what I am talking about here.

Lets say a auto mechanic opened his own auto repair shop with his own money. First of all he or she can charge what ever they want when it comes to auto repair shop hourly rates. Depending on his automotive skill level and ASE certifications he might just want to charge his auto repair customers a high price of $200.00 per hour for working on their car or truck! And to make matters worse he or she now decides to open his or her own auto parts store. Now he has control of the auto-parts prices which he will charge you as his auto repair customer which he can double along with his $200.00 per hour auto shop rates. Keep in mind that auto repair shops across this country do charge their auto repair shop customers any where from $17.50 per hour to $200.00 per hour depending on their moods or how high they are strung out on themselves. Can you imagine how much money a auto repair mechanic who owns his own auto center plus his own auto parts store could make in one day of automotive repair business? But now he wants to add his own auto and truck tow service.

Example for a Normal Auto Repair Shop

I’m thinking now about that credit card commercial a normal auto repair shop would charge you as follows: tow bill $45, diagnostic $25 (time spent on finding your problem), $60 for rebuilt starter, $17.50 for labor to install starter. With a grand total of $147.50 for everything. Now this auto repair bill seems just fine to me and you right?

Example for the Expanding Auto Mechanic Who Has Everything

Keep in mind this auto repair shop bill could be the real thing! This is where the money is when you have your own auto repair shop, auto parts store and your own tow truck service. Here we go again! Tow bill $250-diagnostic time-$200-New starter-$400, 1 hour labor to install starter $200. With his grand total of $1,050.00 for everything. These prices could be you.

Which auto repair shop would you see yourself taking your vehicle into when your car or truck will not turn over with a bad starter motor. The auto mechanic could charge you either $147.50 or $1,050,00 depending on his location and how bad you need your vehicle fixed! I would guess with these prices he could call it a day after a few cars come into his auto service center and buy his auto parts after being unhooked from his tow truck. With all of this said keep in mind these examples could be you if you happen to stroll into his auto mechanics shop who owns his own auto parts store along with his own tow truck service!

Please visit my Auto Repair Savings Blog for more Auto Repair Stories and Advice!


Read More..

AUTOMOTIVE

As you can see theres alot more than just kicking the tires!

I would like to opine on a few myths I have heard about auto mechanics. I heard that we are always bad people. The fact is from experience, during a routine inspection, if we recommend to many services that we will see cause a problem down the road for you, we are labeled as a rip off artist. If we dont recommend all the services that will cause you problems we are labeled as incompetent. As you can see being an auto technician can be very frustrating and difficult at times.

One other tip I can give you, If your happy with your car repair after a few weeks go back and thank the mechanic personally. This is almost never done. The few people that did, I as an auto technician personally took care of these people every time they returned for other services. I gave these people special attention on going that extra mile that you normally dont do. I know its hard some times but try and be nice to your auto mechanic!
Read More..

Triumph 1974 Models Wheel Alignment Guide

TRIUMPH SPECIFICATIONS AND ADJUSTMENTS

TIRE INFLATION (COLD)
Before attempting to check or adjust wheel alignment, make sure tires are properly inflate. Refer to manufacturers specifications in owners manual.

CASTER
All Models - Caster angle is not adjustable. If caster angle is not to specifications, inspect suspension system for wear or damage and repair or replace components as necessary.

CAMBER
All Models - Before adjusting camber angle, inspect suspension for wear or damage and repair or replace components as necessary. To adjust, raise vehicle and support chasis on jack stands. Loosen nuts securing lower control arm bracket to chassis. Add shims equally to increase camber angle. After each adjustment is made, tighten bracket to chassis, remove stands and measure camber angle.

TOE-IN
All Models (Front) - Set front wheels in straight ahead position. If adjustment is necessary, loosen steering link (tie-rod) lock nuts and gaiter clips. Rotate adjusting sleeves equal amounts until correct toe-in is obtained. Tighten lock nuts and recheck toe-in.

Spitfire (Rear) - If toe-in is not to specifications, loosen bolts holding strut front support. Adjust as necessary by adding or removing from the shims fitted between support and body. Tighten bolts and recheck toe-in.

TR6 (Rear) - If toe-in is not to specifications, loosen bolts and nuts securing trailing arm outer bracket to chassis. Add or remove shims between chassis and bracket to obtain correct toe-in. Tighten bolts and recheck toe-in. NOTE - Drive vehicle forward or backward before rechecking rear toe-in.

Read More..

Jaguar XJ6 XJ12 XJS 1975 77 Drive Axles Repair Manual

DESCRIPTION 
The differential assembly is of hypoid design with centerline of drive pinion gear set below centerline of ring gear. A collapsible spaer is used to set drive pinion bearing preload and all other differential adjustments are accomplished using shims. Stub axles transmit power out of differential, through independent rear suspension, to drive wheels. A clutch pack limited slip unit, "Powr-Lok", is available as an option.
AXLE RATIO AND IDENTIFICATION
Jaguar uses only one basic rear axle design, however, unit may not be fitted with a traction lock device. Also several different axle ratios are used. To determine axle ratio, divide number of ring gear teeth by number of pinion gear teeth. Whether or not axle is fitted with traction lock should be determined owner inquiry or test.

REMOVAL AND INSTALLATION
Rear Suspension Assembly
NOTE - This procedure is provided since many operations on the final drive require removal of rear suspension assembly before starting work on final drive.
1) Raise and support vehicle. Place stands forward of radius arms on body with wood blocks between body and stands. Remove wheels. Remove mufflers from tail pipes. Remove safety wire and bolts securing safety strap and radius arm from body mounting post. Disconnect and plug brake lines at body.
2) Remove clevis pin securing hand brake cable to actuating levers on crossmember. Loosen lock nut and remove outer hand brake cable screw from adjuster block. Detach drive shaft from differential. Place jack under rear suspension. Remove bolts and lock nuts securing crossmember mounts to frame. Lower and remove rear suspension from vehicle. To install, reverse removal procedure and note the following. Bleed brakes. Tighten radius arm nuts on lower control arm when weight of vehicle is on wheels.
HALF SHAFT
1) Remove rear suspension assembly. Remove rear hub as follows: Remove fulcrum shaft grease fitting. Withdraw cotter pin and remove nut and washers from splined end of half shaft. Using suitable puller, pull hub and carrier from half shaft. Remove spacer from half shaft and examine inner oil seal track. Replace track if necessary. Remove one nut from outer suspension arm fulcrum shaft and using soft hammer, drift out shaft. Remove hub and carrier assembly from car.
2) Support suspension arm with jack and remove nut and bolt securing top of forward shock absorber. Remove nuts and washer securing shock absorber to suspension arm and remove shock. Remove four nuts securing half shaft flange to stub axle flange and brake rotor. Pull half shaft from suspension unit noting number of camber shims installed between half shaft flange and brake rotor. If necessary, remove joint shields by drilling out rivets.
3) To install, reverse removal procedure, noting the following if necessary, replace joint shield, positioning grease nipple access hole correctly. Cover joint lines in shield with non hardening waterproof sealing compound. Be sure to replace camber shims. To reinstall rear hub, proceed as follows: Install suitable dummy shaft (JD.14) in hub carrier fulcrum. Install carrier on suspension arm, installing shims removed from between carrier and suspension arm. Replace outer suspension arm fulcrum shaft, displacing dummy shaft. Secure shaft with nut and reinstall grease nipple.
Fig. 1 Exploded view of Jaguar "Power-Lok" Differential Assembly
4) If necessary, install oil seal track to half shaft splined flange, replace spacer. Thoroughly clean and de-grease splines of half shaft and bore of hub. Using a small brush sparingly apply Lactite "Stud Lock" to outer two thirds of half shaft splines. Assemble hub carrier to half shaft. Install washer and tighten hub carrier assembly nut. Install new cotter pin. Install dial indicator so it bears against hub and zero indicator. Using two levers, pry out on hub and measure hub bearing endfloat. If endfloat exceeds specifications, overhaul rear hub and carrier assembly. After installation of rear suspension in vehicle, check rear wheel camber.
STUB AXLE OIL SEAL
1) Remove half shaft. Remove locking wire and withdraw bolts securing brake caliper to final drive unit. Remove brake rotor, noting number of shims removed between rotor and stub axle flange. Remove lock wire and five bolts securing caliper mounting bracket. Withdraw drive shaft, together with caliper mounting shims, ball bearing and oil seal. Turn down tab washer and remove nut nut from stub axle. Remove ball bearing and caliper mounting bracket from stub axle.
2) Lightly oil seal and position carefully in final drive case. Press seal squarely and fully seat in case groove. Do NOT remove protruding portion of seal. Coat seal with hypoid oil and place caliper mounting bracket and seal assembly over stub axle. Slide ball bearing on drive shaft followed by new tab washer and nut. Ensure bearing seats square to stub axle shoulder and tighten nut. Turn up tab on washer.
3) Lightly oil stub axle splines and install shaft in final drive housing. Install bolts securing mounting bracket finger tight. Using feeler gauge, measure dimension between inside face of mounting bracket and final drive housing. The measurement obtained determines shim thickness required, and thinly coat mating faces and shims with suitable sealant (Hylomar). Tighten bolts in a diagonal sequence.
4) Wire lock securing bolts to tension in clockwise direction. Install brake rotors and half shaft flange, using shims removed from between rotor and flange. Install caliper on mounting bracket. Install suitable distance spacers (oversize nuts) to rotor studs and tighten nuts. Use feeler gauges to ensure that rotor is centrally located between jaws of caliper. If necessary add to or remove from shim pack between flange and disc to center rotor. Continue assembly in reverse of disassembly procedure.
PINION FLANGE AND SEAL
1) Disconnect propeller shaft. Check and record torque required to turn drive shaft flange clockwise (viewed from front) through backlash movement. Check rear wheels and remove flange securing nut and washer. Remove flange. Pry oil seal out of final drive case. Lightly score oil seal recess with tang of file.
2) Ensure oil seal recess is clean and free of oil. Lightly top new oil seal into recess ensuring seal is square with case. Reinstall flange, washer and nut. Tighten nut to 120 ft. lbs. (16.5 mkg) while rotating flange to ensure bearing seats correctly. Again check pinion preload. If preload is below specifications, continue tightening flange nut until specified preload is obtained. However, if preload exceeds maximum specified value, new collapsible spacer must be installed, see differential overhaul. Reconnect propeller shaft and remove wheel chocks.
FINAL DRIVE UNIT
1) Remove rear suspension assembly and drain final drive unit. Remove final drive mounting plate and shock absorber/spring units. Remove nuts securing half shaft inner universal joint to brake rotor and disconnect half shaft, noting shims removed. Remove nut from inner suspension arm fulcrum shaft and drift out shaft. Repeat for other side of unit. Disconnect and plug brake lines. Disconnect hand brake levers from compensator.
2) Remove locking wire from final drive mounting bolts, remove bolts and crossmember by tilting forward over pinion. Remove calipers from final drive unit. Remove brake rotors, noting number of shims removed from between rotor and stub axle flange. To install, reverse removal procedure  making sure brake rotor is centered between jaws of caliper and wire lock tension bolts in clockwise direction.

OVERHAUL
Fig. 2 Exploded View of Limited Slip
Differential Clutch Pack and Side
and Pinion Gears
1) Remove rear cover and discard gasket. Remove lock wire and bolts securing caliper mounting bracket. Withdraw stub axle along with caliper mounting brracket shims, ball bearing and oil seal. Turn down tab washer and remove nut, ball bearing and caliper mounting bracket from stub axle. Repeat procedure fro second stub axle. Remove bolts securing differential bearing caps and lift off caps. Pry out differential assembly using two levers and taking care not to damage housing.
2) Remove drive pinion nut and washer. Mark relative positions of flange and pinion and remove flange. Using a suitable press, remove pinion from differential housing. Remove oil seal, oil thrower and outer bearing cone. Examine inner and outer bearing cups fro wear. If replacement is required, extract cups using suitable tools (SL.14 and SL. 14/1). NOTE - If removal of bearing cups is difficult, gently heat final drive housing in rear of bearing caps. On "Powr-Lok" differentials only, proceed as follows:
3) Remove differential side bearings using suitable tools (SL.14 and 14/3). If no reference marks are present, scribe a line across both halves of differential case to ensure correct reassembly. Remove bolts securing both halves of differential case. Split case and remove clutch discs and plates from one side. Remove differential side ring, pinion side gear and pinion cross shafts complete with gears. Remove remaining side gear and ring and extract remaining clutch discs and plates.
4) On non "Powr-Lok" differential only, remove peening and drift pinion shaft lock pin out of carrier. Remove gears, shaft and shims from carrier.

REASSEMBLY AND ADJUSTMENT
 Fig. 3 Measuring Side Bearing Preload
Case Assembly - 1) On "Powr-Lok" differentials, install clutch plates and disc alternately into flange half of case. Installtwo belleville clutch plates so that convex sides are against case. Install side ring and position one side gear into ring recess. Install cross shafts. Install pinion cross shafts complete with pinion gears ensuring that ramps on shafts coincide with mating ramps in case.
2) Assemble differential case halves ensuring that reference marks are lined up and clutch friction plate tongues are aligned with grooves in differential case. Install bolts but do not tighten yet. Check alignment of splines by inserting both stub axles. Tighten differential case bolts with stub axles in position. With one stub axle locked, other axle must not turn more than .75" (19 mm) measured on a 6" (152 mm) radius.
3) On non "Powr-Lok" differentials, install pinion shaft, shims and gears into differential carrier. Secure lock pin by peening.
Side Bearing Preload - Install differential side bearing without shims, on differential case, making sure that bearing and housing are perfectly clean. Place differential assembly in housing. Install dial indicator with indicator leg against back face of ring gear. Using sutiable pry bars between housing and bearing cups, move differential assembly fully to one side of housing. Zero dial indicator and move assembly to other side. Record indicator reading and add .009" (.20 mm) to reading to give total shim pack required. Remove differential assembly from housing.
Fig. 4 Measuring Drive Pinion
Gear Installed Depth
Drive Pinion Depth - 1) Place pinion, together with inner bearing cone, into housing. Turn housing over and support pinion. Install pinion outer bearing cone, flange, washer and nut, omitting collapsible spacer, oil slinger and oil seal, tighten nut. Using suitable dial indicator support fixture (SL3), zero dial indicator on setting block (4.H.A.). Place dial indicator fixture firmly on face of pinion and not indicator reading to bottom of housing bearing bore (see illustration).
2) The indicator reading shows deviation of pinion setting from zero cone setting. This value agree with value etched on face of pinion at bottom. For example, if value etched on pinion is -2, dial indicator should read -.002". If setting is incorrect, dismantle pinion and remove pinion inner bearing cup. Add or remove shims as required, reassemble and recheck pinion depth.
3) When setting is correct, extract pinion fro housing sufficiently far to remove outer bearing cone. Install collapsible spacer to pinion ensuring that it seats firmly on machined shoulder of pinion. Insert pinion into housing, install outer bearing cone, oil slinger and oil seal. Lightly grease splines of pinion shaft and install flange. Install new washer on end of pinion with convex side facing end of shat. Install but DO NOT tighten nut.
Backlash Adjustment - 1) Place differential assembly complete with side bearings but less shims, in housing. Ensure that bearings and housing are perfectly clean. Install dial indicator on housing with feeler on back face of ring gear. Pry differential case and ring gear assembly away from pinion until opposite side bearing is seated against housing. Zero dial indicator at this point.
2) Move differential assembly towards pinion until ring gear is deeply meshed with pinion. Note indicator reading and from this value, subtract the backlash allowance etched on drive gear (eg B/L.007 dones .007"). This result will yield the thickness of shims (in inches) to be placed between differential case and side bearing on ring gear side of differential. Install this thickness of shims (in inches) to be placed between differential case and side bearing on ring gear side of differential. Install this thickness of shims, taking shims from pack determined previously under "Side Bearing Preload". Install balance of total shims required on opposite side of case. An example of calculations required follows
EXAMPLE:
Fig. 5 Measuring to Determine Ring Gear
Side Shim Thickness
     Side Bearing Preload Reading.....................  .080"
     PLUS Preload Value.................................   .009"
     Total Shim Pack.......................................  .089"

     Pinion-to-Ring Gear Clearance...................  .042"
     MINUS Etched Backlash Value..................  .007"
     Total Ring Gear Side Shims.......................  .035"

     Total Shim Pack.......................................  .089"
     MINUS Ring Gear Side Shims...................  .035"
     Opposite Ring Gear Shim Pack..................  .050"
3) With shims calculated installed, lower differential assembly into position, lightly tapping bearings home with a soft hammer. Make sure ring and pinion gears mesh as installation proceeds. Install side bearing cups, ensure proper cup is placed in proper bearing. Tighten cup bolts. Mount dial indicator on housing with feeler against back face of ring gear. Turn pinion by hand and check ring gear run out. If run out exceeds specifications, disassemble differential, clean all mounting surfaces and check for burns.
Fig. 6 Measuring  Ring Gear-to-Drive Pinion
Gear  Backlash
4) Now place dial indicator to measure ring gear backlash. Move ring gear and check that backlash is to specifications, transfer necessary shims from side of differential case to the other. NOTE - To increase backlash, remove shims from ring gear side and install on opposite side and vise versa. Finally run a gear tooth contact pattern and adjust shims as necessary.
Pinion Bearing Preload - Install pinion and stub axle of seals. Install stub axles following procedure given under stub axle removal and installation. Tighten flange nut to specified torque. During tightening process rotate flange to ensure correct seating of taper roller bearings. Use care not to over tighten nut. if nut is overtightened, install a new collapsible spacer as pinion bearing preload will otherwise be incorrect. Install final drive rear cover using new gasket and suitable sealer (Hylomar).


Read More..

Guaranteed Auto Repair Savings

Guaranteed auto repair savings would be nice if it was true. The truth is no one can guarantee auto repair savings nor will they want to. There are so many auto parts out there sitting on the shelves either going bad or is bad. And think about it, if some auto repair shop guaranteed auto repair savings they would be out of business. Human error is a contributor to autos breaking down sooner than expected. Auto repair savings can not be guaranteed is the bottom line. Now if you were giving away your auto repairs for free then maybe you can guarantee your auto repairs for the life of the car. Wouldnt that be nice having a auto repair shop guarantee your auto repair in savings in writing?


"Guaranteed auto repair savings" would look nice as a bill board over Las Vegas or some place like that! How many people would be lined up for guaranteed auto repair savings? Think about it your auto repairs are guaranteed. Guaranteed for how long is the question I would be asking the auto repair shop who is promising guaranteed auto repair savings. And in order to put that in writing that their auto repairs are guaranteed I would say they have a lot of kudos. Guarantee is a pretty strong word in the auto repair shops. So the next time you see a auto repair shop who guarantees their work ask them how is your auto repairs guaranteed. Guaranteed auto repair savings is something anyone can say who guarantees their auto repairs. lol See if you can say all of this real fast 3 times. Its a real tonge twister! Guranteed Auto Repair Savings.
Read More..

Porsche 964 Repair Manual

Manufacturer: Porsche
Model: 964/ 911 Carrera 4 Carrera 2


Contains the following information and repairs for:

  • Engine Maintenance
  • Automatic Transmission
  • Manual Transmission
  • Chassis
  • Body
  • Heating 
  • Ventilation
  • Air Conditioning
  • Electrics
  • Wiring Diagrams
File Size: 154 MB
File Type: PDF, RAR
Read More..

Suzuki Samurai SJ Repair Manual

Manufacturer: Suzuki
Model: Samurai


Contains the following information and repairs for:

  • General, Special Tools and Service Materials
  • Periodic Maintenance Service
  • Trouble Shooting
  • Engine
  • Fuel System (Carburetor, Air Cleaner, Fuel Pump, and Fuel Filter)
  • Emission Control System
  • Engine Cooling System
  • Car Heater
  • Ignition System
  • Cranking System
  • Charging System
  • Clutch
  • Gear Shifting Control
  • Transmission
  • Transfer Gear Box
  • Propeller Shafts
  • Differential
  • Suspension
  • Steering System
  • Brakes
  • Body Service
  • Body Electrical Equipment
  • Service Data
File Size:
File Type: PDF, RAR
Read More..

Mitsubishi Eclipse Repair Manual

Manufacturer: Mitsubishi
Model: Eclipse
Year: 2000 to 2002


Contains the following information and repairs for:

  • General
  • Engine
  • Engine Lubrication
  • Fuel 
  • Engine Cooling
  • Intake and Exhaust
  • Engine Electrical
  • Engine and Emissions Control
  • Clutch
  • Manual Transaxle
  • Automatic Transaxle
  • Front and Rear Axle
  • Wheel and Tire
  • Power Plant Mount
  • Front Suspension
  • Rear Suspension
  • Service Brakes
  • Parking Brakes
  • Steering
  • Body
  • Exterior
  • Interior and Supplemental Restraint System (SRS)
  • Chassis Electrical
  • Heater, Air Conditioning and Ventilation
  • Component Locations
  • Configurations Diagrams and Splice Locations
  • Circuit Diagrams
  • Alphabetical Index

File Size: 109 MB
File Type: PDF, RAR


Read More..

Audi S90 100 1970 73 Brake Repair Guide

Models Covered
  • S90 (1970-72)
  • 100 (1970-73)


DESCRIPTION
Brake system is hydraulically operated, utilizing a tandem master cylinder and Teves T 51/349 power brake unit. Front disc brakes consist of rotors attached to transmission output flanges, and two-piston calipers attached to transmission. Disc pads are equipped with a ceramic transmitter-type wear sensor. Transmitter is mounted on cross spring and will break when contact is made with pad plates, interrupting control circuit and causing indicator light on instrument panel to be activate. Rear brakes are leading-trailing shoe/drum type, using a dual piston wheel cylinder. Parking brake is cable actuated, operating secondary shoes of rear brake assemblies.
ADJUSTMENT
NOTE - Adjustments or readjustments should be carrier out on cold brakes. However, brakes must be warm when testing. Instrument panel trim must be removed to adjust master cylinder push rod free play.
MASTER CYLINDER PUSH ROD FREE PLAY
Check brake pedal free play by measuring distance between master cylinder push rod and master cylinder piston. This measurement should be .039" (1.0 mm), which would give free play of .20" (5.08 mm) at brake pedal. If necessary to adjust, loosen lock nut on push rod and turn push rod until correct clearance is obtained. Tighten lock nut and again measure pedal free play at brake pedal.
FRONT DISC BRAKES
Front disc brakes are self-adjusting, therefore, no adjustment in service is required.
REAR DRUM BRAKES
Raise and support rear of vehicle release parking brake. Using a 17 mm wrench, tighten eccentric adjusters until wheels can no longer be turned by hand. Loosen eccentric adjusters until wheels are just free to turn.
PARKING BRAKE
Raise and support rear of vehicle and adjust rear brakes. Lift parking brake lever until it engages third ratchet stop. Adjust nut at equalizer until rear wheels are just free to turn. When parking brake lever is pulled up one additional notch (to fourth ratchet stop), rear wheels should be locked.
HYDRAULIC SYSTEM BLEEDING
Fill master cylinder reservoir with brake fluid and maintain level throughout bleeding operation. Attach a hose to bleeder screw, and immerse opposite end in a container partially full of brake fluid. Open bleeder screw approximately one-half turn, depress brake pedal, close bleeder screw, and slowly return pedal. Continu operation until air bubbles are no longer seen in discharge fluid. Bleeding sequence is left-rear, right-rear, right-front, left-front.
REMOVAL & INSTALLATION
FRONT DISC BRAKE PADS
Removal - Remove lock clips. Pull out retaining pins so they project into openings in side members. NOTE - Do not remove rubber grommets from side member holes. Using a suitable extractor tool (SB-3), remove disc pads from caliper.
NOTE - Disc pads can be removed on right side only after removing front exhaust pipe.
Installation - Press both pistons into caliper bores.
NOTE - Fluid level in master cylinder reservoir will rise.
Siphon sufficient fluid to prevent reservoir from overflowing. Ensure pistons are in correct alignment in bores using suitable tool (B-5). Install disc pads in recesses of caliper, slide in retaining pins, and install lock clip. Pump brake pedal several times to position disc pads. Bleed hydraulic system if necessary.
FRONT DISC BRAKE CALIPER & ROTOR
Removal - 1) On vehicles equipped with automatic transmission, disconnect steering damper from its bracket and move out of way. On all models, depress brake pedal approximately 1.2" (30.48 mm) and hold in this position by using suitable pedal support. Disconnect temperature transmitter wire from connector (near transmission)
2) On automatic transmission equipped vehicles, disconnect hydraulic line at union on transmission, EGR line at exhaust pipe, and exhaust pipe from hangers. On all models, disconnect and remove front exhaust pipe and shield from manifold, and drive shaft at stub axle.
3) Remove ball joint mounting bolts, pull wheel downward, and swing out steering knuckle after prying it off ball joint. Remove disc brake pads, leaving spring and wire in vehicle. Remove EGR filter from oil  pan. Remove caliper mounting nuts, then remove caliper and rotor from stub axle. NOTE - If necessary, pry engine assembly to one side to ease removal.
Installation - To install, reverse removal procedure, tighten caliper mounting bolts securely, and bleed hydraulic system.
REAR BRAKE DRUM
REAR BRAKE ASSEMBLY
Removal - Raise and support vehicle, remove wheel and tire assembly. Pry off dust cap, remove cotter pin from hex nut, and remove nut. Remove brake drum making sure that retaining washer and wheel bearing do not fall out.
Installation - To install, reverse removal procedure adjust brakes, and adjust wheel bearings. See Wheel Bearing Adjustment in WHEEL ALIGNMENT Section.
REAR BRAKE SHOES
Removal - With brake drum removed, remove retaining spring for brake shoes. Remove shoes as an assembly by disconnecting spring at bottom, pulling shoes back from wheel cylinder, and disconnecting parking brake cable.
Installation - To install, reverse removal procedure and not the following: Make sure long ends of retainin clip and spring are installed on secondary shoe and parking brake lever. Ensure brake shoes are correctly positioned on wheel cylinder pistons.
REAR BRAKE WHEEL CYLINDER
Removal - With drum and shoes removed, depress brake pedal approximately 1.4" (35.56 mm) and hold in this position by using suitable pedal support. Disconnect remaining hydraulic line and cylinder mounting nuts. Separate master cylinder from power unit, taking care not to lose "O" ring installed between units.
Installation - To install, reverse removal procedure, adjust brakes and bleed hydraulic system.
MASTER CYLINDER
Removal - Disconnect hydraulic line at rear of master cylinder. Depress brake pedal 1.2-1.6" and hold in position using a suitable pedal support. Disconnect remaining hydraulic line and cylinder mounting nuts. Separate master cylinder from power unit taking care not to lose "O" ring installed between them.
Installation - To install, reverse removal procedure and bleed hydraulic system.
POWER BRAKE UNIT
Removal - Siphon brake fluid from master cylinder reservoir and disconnect hydraulic lines. Loosen hose clamp and disconnect vacuum hose from power unit. From inside vehicle, remove trim below instrument panel as necessary. Disconnect push rod form brake pedal, remove power unit adapter attaching nuts, and remove power unit and master cylinder from engine compartment as an assembly. Separate master cylinder and adaptor from power unit.
Installation - To install, reverse removal procedure and note the following: Be sure to install "O" ring between master cylinder and power unit. Install adaptor to power unit so that center punch mark on adaptor is located on lower right hand side facing engine. To complete installation, adjust pedal push rod free play and bleed hydraulic system.
Check Valve Replacement - A vacuum check valve is locate in vacuum line between intake manifold and power it. To remove, loosen hose clamps, separate vacuum hoses from check valve, and remove check valve. To install, reverse removal procedure and not the following: Check valve is stamped with the word "MOTOR" and an arrow. End of valve in which arrow points must be connect to shorter hose from intake manifold.
OVERHAUL
FRONT DISC BRAKE CALIPER
FRONT DISC BRAKE CALIPER ASSEMBLY
Disassembly - Remove disc pads. Pry out retaining ring and remove dust seal by hand. Place a small block of wood in caliper cavity, and remove piston by applying compressed air to fluid inlet. Remove remaining piston in same manner. Remove seal from caliper bore using a piece of wood or plastic. NOTE - Do not use hard or sharp tools for this purpose. Do not separate caliper halves.
FRONT DISC BRAKE CALIPER ASSEMBLY
Cleaning & Inspection - Clean all parts in alcohol only. Check cylinder bore and piston for damage. NOTE - Do not machine caliper bore or piston. Parts are serviced by replacement only.
PINION INSTALLATION
Reassembly - Coat all parts with ATE brake cylinder paste (or equivalent), reverse  disassembly procedure, and note the following: Use new seals, dust boots, and retaining rings when reassembling. When installing piston, make sure machined surface of piston face makes a 20° angle to wall of caliper bore (see illustration). Install disc pads after caliper has been installed on vehicle.
REAR WHEEL CYLINDER
Disassembly - Thoroughly clean outside of cylinder. Remove end caps, piston and seal assemblies, and spring. Remove dust cap and bleeder screw.
AUDI MASTER CYLINDER
(COMPONENT PARTS)
Cleaning & Inspection - Clean all parts in alcohol only. Check all parts for rust, corrosion, and damage. Check cylinder bore and piston for wear or damage. Cylinder bore should not exceed .6287" (16.00 mm) and piston diameter should not be less than .619" (15.74 mm). NOTE - Manufacturer recommends replacing rubber components on each disassembly.
Reassembly - Reverse disassembly procedure and not the following: Apply a thin coat of ATE brake cylinder paste (or equivalent) to all parts during assembly.
MASTER CYLINDER
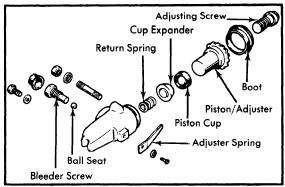
Disassembly - Remove reservoir, brake light switch, circlip and dismantle cylinder. To extract piston, unscrew stop screw.
Cleaning & Inspecting - Clean all parts in denatured alcohol. Inspect bore and piston for rust or wear and replace any parts out of tolerance. It is advisable to always replace rubber parts.
Reassembly - Preassemble pistons and coat cups with ATE brake cylinder paste (or equivalent). Insert assembly into cylinder bore, install stop screw and circlip. Install brake light switch and resrevoir.
NOTE - Models without power brake servo differ slightly. Primary piston desgin is somewhat varied. Piston is equipped with only on secondary boot. There is no air compensating bore. Brake light switch location is different.


Read More..